The current Restorative Dentistry has been trying to unite esthetic and conservative concepts. Thus, treatments with good long-term prognosis, preservation of dental structure and high aesthetic satisfaction of the patient are recommended. In this context, we highlight ceramic laminates, which cover part or all of the vestibular face of the anterior teeth, sometimes without requiring dental preparation or only with minimal wear. In addition to possessing qualities indispensable to a restoration, such as durability and possibility of strong adhesion to dental enamel, are the materials that most resemble the tooth, providing a natural and pleasing appearance. The objective of this work is to describe, through a case report, the challenges regarding the aesthetic aspects of a unitary ceramic laminate in the correction of a compromised central incisor. The authors conclude that through proper planning, proper execution of preparation, molding and cementation techniques, and especially allied to a professional ceramist of excellence, it is possible to restore the harmony of the smile and mimic the restorative treatment to adjacent natural teeth
Based on their abrasion resistance, longevity, conservative nature, optical properties, biocompatibility, and aesthetics, ceramic laminates have been considered one of the most viable treatments since the introduction of the CAD/CAM system in 1983, but more incisively in the last decade [1,2,3,4,5]. However, ceramics are brittle and have low mechanical strength when subjected to tensile stresses, which compromises their clinical performance in some aspects [2,3]. Such treatment modality is indicated to rehabilitate teeth that present mild or moderate color alteration, subtle malposition, malformation in the dental structure, insistent direct composite resin restorations or other problems that tend to impair aesthetics [6,7].
In this context, the aim of this article is to show the feasibility and challenges of using an indirect ceramic restoration when applied to a single tooth, discussing the aspects involving materials, applications and techniques.
A 34-year-old female patient in good general health came to the Prosthodontics Specialization Clinic of the Unichristus, presenting as main complaint element 11, which had unsatisfactory color and shape (Figure 1). This tooth had a class IV direct composite resin restoration on the mesial surface, which was performed several times, but always resulting in color and optical characteristics incompatible with the rest of the arch. (Figure 1)
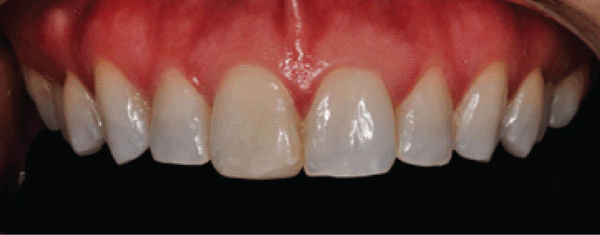
Figure 1: Initial intraoral photograph.
The decision for a ceramic veneer on tooth 11 was made with the patient, who desired an aesthetic, conservative treatment with greater clinical longevity. After a thorough clinical examination, it was observed that tooth 11 was slightly proclined and minimally rotated in relation to neighboring teeth. Thus, it would be safer to make a wear matrix to guide the preparation of this tooth (Figure 2).
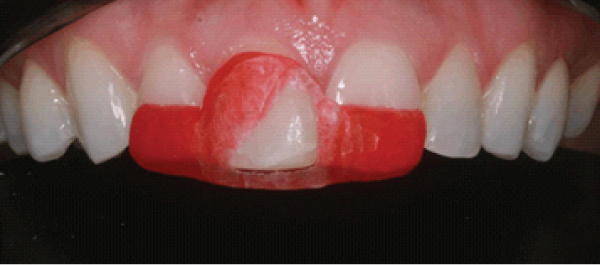
Figure 2: matrix to guide.
The upper and lower arches were anatomically molded with condensation silicone (Perfil®, Vigodent S/A Indústria e Comércio, Rio de Janeiro, R.J., Brazil) and cast with alginate Hydrogum 5® (Zhermack, Badia Polesine, Italy) and cast with special stone cast Herostone® (Vigodent S/A Indústria e Comércio, Rio de Janeiro, R.J., Brazil) to obtain the diagnostic wax-up and wear matrix, both performed in the laboratory. The interocclusal registration was re-performed in maximal habitual intercuspation (MHI) with dense paste of the same condensation silicone.
In the following session, with the wax-up in hand, it was possible to give the patient a preview of the final treatment result by making a mock-up in bisacrylic resin Protemp 4® (3M/ESPE Dental Products St. Paul, USA) in color A1. With the immediate approval of the mock-up by the patient, the minimal preparation of the dental element was started, with the aid of the wear matrix made by the laboratory. Since the Class IV composite resin restoration was less than 3 mm long, it was decided to remove it completely, so that the veneer would adhere only to the tooth structure. During preparation, a KG Soseren 2215 (KG Sorensen, Barueri, SP, Brazil) truncated cone-shaped diamond point was used, with final grinding around 1 mm, with a subgingival beveled end on the buccal surface and extension on the interproximal surfaces, aiming to hide the maximum possible cementation line in these areas. Sandpaper strips were also used on the proximal surfaces, slightly breaking the proximal contact points in order to allow the molding material to flow into the region (Figure 3).
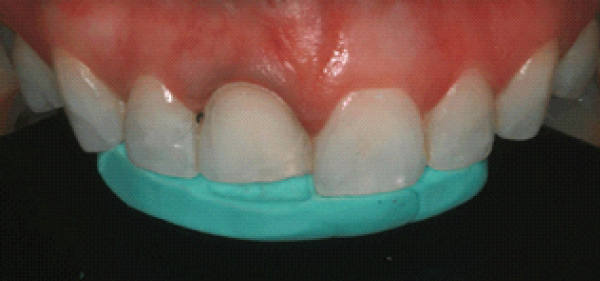
Figure 3: Finished Preparation.
Ultrapak® Retractor wire number 000 (Ultradent Produtos Odontológicos, Indaiatuba, SP, Brazil) was inserted in the vestibular region of element 11 for better exposure and refinement of the cervical termination, besides its proper copy in the functional molding, which was used double molding with addition silicone Futura AD® (DFL Indústria e Comércio Ltda., Rio de Janeiro - RJ, Brazil) (Figure 4). The double wire technique was used, being the second, the Ultrapak® retractor wire number 1 (DFL Indústria e Comércio Ltda., Rio de Janeiro - RJ, Brazil). For the shade selection of the prosthetic piece the following procedures were performed: 1) shade taking A1 with Vita Classical scale by the dentist; 2) detailed photo essay; 3) shade taking with the patient in the prosthetic laboratory by the ceramist.
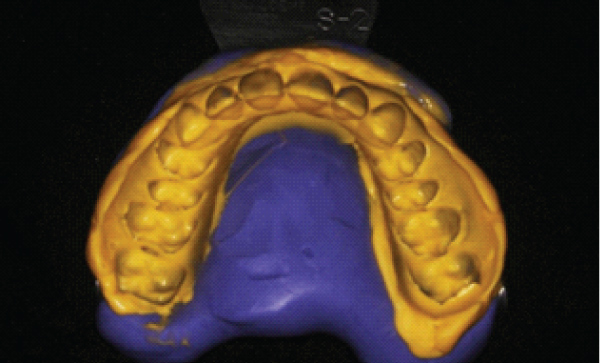
Figure 4: Mold made with addition silicone.
The veneer was made of the IPS E-Max® Press system (Ivoclar-Vivadent, Barueri, SP, Brazil), which consists of a lithium disilicate-impregnated glass-ceramic ingot with LT (Low Translucency) translucency level and A1 shade, made in an injection-molding technique. Subsequently, it was made up and glazed, taking into consideration the color, texture and individual aspects of the neighboring teeth.
After try-in of the piece in position to observe its adaptation, wet try-in tests with try-in pastes were used for shade selection of the Variolink® Esthetic LC resin cement, Ivoclar-Vivadent® (Ivoclair, Barueri, SP, Brazil). It was observed that the Neutral shade was able, together with the ceramic, to hide the darkened substrate and make the relationship of the tooth in question harmonious with the rest of the smile. Care was also taken to check the marginal adaptation and incisal contact of the veneer, which was also rated as satisfactory by the patient.
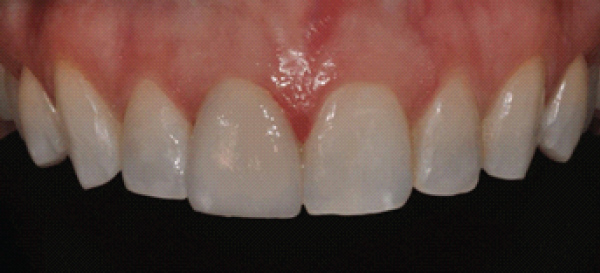
Figure 5: Trial of the ceramic laminate with try-in color neutral.
This was followed by the surface treatment of the laminate with the protection of the buccal surface and conditioning with 10% hydrofluoric acid Condac Porcelana® (FGM Produtos Odontológicos, Joinville, SC, Brazil) for 20 seconds, washing followed by the application of 37% phosphoric acid Condac37® (FGM Produtos Odontológicos, Joinville, SC, Brazil) for 30 seconds. After washing in running water for one minute, two layers of silanization were applied with Prosil® (FGM Produtos Odontológicos, Joinville, SC, Brazil) and, after complete evaporation of the solvent, a thin layer of Adper Single Bond 2® (3M/ESPE Dental Products St. Paul, USA) adhesive was applied. The excess was carefully removed with air jets without light curing.
Again the Ultrapak® Retractor wire number 000 (Ultradent Produtos Odontológicos, Indaiatuba, SP, Brazil) was inserted into the tooth in question and the substrate was conditioned with 37% phosphoric acid Condac37® (FGM Produtos Odontológicos, Joinville, SC, Brazil) for 30 seconds in enamel and washed with plenty of water for 20 seconds. Cementation was started by manipulating the purely light-activated resin cement Variolink® Esthetic LC, Ivoclar-Vivadent® (Ivoclar-Vivadent, Barueri, SP, Brazil) in a 1:1 ratio. After the piece had settled on the substrate, excess cement was removed with an insertion spatula, brush and dental tape. The polymerization proceeded for 60 seconds on the buccal and incisal surfaces of the element and subsequent removal of the retractor wire. After fully completed the cementation process (Figure 6), occlusal analysis was performed in maximal habitual intercuspation and during the anterior and canine guides.
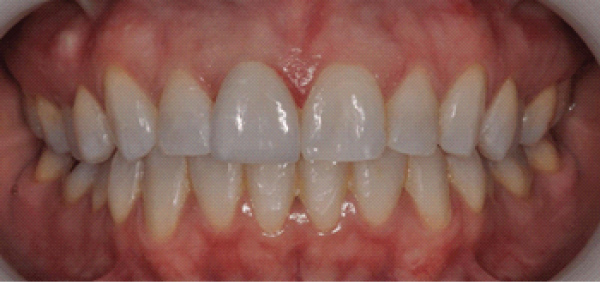
Figure 6: Final Photo.
Discoloured tooth-coloured substrates or fused-in core build-ups without tooth-coloured matched translucent ceramics of varying thicknesses may compromise the esthetic results. For this reason, the shade of the preparation/substrate must be determined together with the desired tooth shade for the selection of the suitable ingot. In such cases, it is necessary to use alternatives to mask these substrates and achieve natural esthetics, such as by using opaque ceramic frameworks and appropriately shaded cements [4,8,9]. In the case presented here, the color of the substrate and adjacent teeth was evaluated using a scale, photographs, as well as in person at the patient's visit to the laboratory.
Feldspathic ceramics show greater color variation over time compared to lithium disilicate ceramics. And a study conducted in 2018 evaluated the color stability of ceramic laminates made with high translucency (HT) and low translucency (LT) lithium disilicate wafers, in which it showed that HT ceramics exhibited greater color changes upon aging. Therefore, for HT ceramics, the use of transparent resin cement is recommended [10]. In the case exposed in this article, the LT lithium disilicate wafer was used, which tends to have less color variation over time. The main reason for this choice was the color of the A2 substrate, even with previous tooth whitening.
Various types of dental preparations for veneers have been proposed, depending on factors such as the properties of the ceramic material, the remaining shade of the tooth structure, the need to change the tooth contour, the laboratory fabrication technique and the occlusal relationships, individualizing each case [11]. If the clinical situation permits, conventional veneer preparation is not required [8].
In the case in question, the discoloration was mild and the tooth slightly proclined, thus justifying the preparation technique for veneers. The mock up and wear guide technique contributed to an individualized preparation of at most 1 mm in some areas, enough to mask the shade defect and ensure adhesion on enamel.
In relation to the cementation of ceramic pieces, there are particular and important aspects for the success of the final result and longevity of the treatment. The cement selection must be based on scientific knowledge, as there are numerous techniques and cementing agents with different surface treatment possibilities. It is noteworthy that the effectiveness of the surface treatment is related to the composition of the ceramic, so knowing the selected material and its composition are relevant for correct handling of the prosthetic piece[12].
The resin cement can affect approximately 10 to 15% of the optical results of all-ceramic restorations. It is also recommended to use try-in cements to assist in accurate cement shade selection [4]. Corroborating with these studies, all surface treatment of the specimen and preparation was performed, faithfully following the manufacturer's instructions, as well as the test with try-in paste and a Neutral color cement was chosen. However, the type of setting chosen was the light-cured cement, due to the absence of tertiary amines, allowing greater control during the setting and removal of excess cement in the proximal areas.
When indicated, the characterization requirements of the restorations are usually subtle, but in some they may be more evident and depend on the clinical scenario and the patient's desire to maintain characteristics in their prosthetic restoration [13]. A practical approach is the shade distribution chart, in which the tooth is divided into three thirds: incisal, middle and cervical. The shade selection is performed independently for each third. Also a chart for surface features can be useful, where useful details such as fractures and hypocalcifications are marked and sent to the lab along with a digital image [14].
According to the manufacturer, the more opaque HO and MO lithium disilicate-reinforced ceramic ingots are predominantly suitable for the layering technique, while the more translucent LT and HT ingots are used for the cut-back and staining technique [4]. The HT blocks provide higher translucency and lower value than the LT blocks. LT blocks have the highest brightness and the most natural chroma [8].
In the staining technique, pressed restorations are completed by applying stains (IPS e.max Ceramic Shades®, Essence, Ivoclar-Vivadent, Barueri, SP, Brazil) and glazing materials. In this sense, the use of translucent IPS e.max Press® ingots (Ivoclar-Vivadent, Barueri, SP, Brazil) permits the fabrication of highly esthetic restorations on nondiscolored or slightly discolored preparations with minimum effort [8].
In the clinical case presented here, the gum used was the LT and the characterization was obtained by the staining technique, as indicated by the manufacturer. The patient went to the laboratory to have the ceramist responsible for the staining technique analyze the neighboring teeth and draw the extrinsic characterization graph of the tooth in question. Figure 6 shows how harmonic and similar the final result was in terms of color, translucency, and individualization, such as the enamel pearl reproduced on the distal side, similar to the one on tooth 21.
The technique of indirect restoration with ceramic laminate proved to be efficient in restoring the aesthetics of the smile as a whole, overcoming the challenge of giving the patient back a single dental element with shape, color, position and surface texture similar to those of neighboring teeth. Even with the difficulty in achieving satisfactory aesthetics with the restoration of only one dental element in the aesthetic zone, it can be concluded that, through adequate planning and the execution of clinical and laboratory phases with excellence, it is possible to reestablish smile harmony in a conservative manner.
Informed consent was obtained from all individual participants included in the study.
The authors report no conflict of interest.